About Me

My photo
I am a stay at home mom who finds little snippets of time to craft and create.
Powered by Blogger.

Search This Blog

Tuesday, November 20, 2012

Lace crown

 I wanted to make a cute little lace crown that I have been seeing on pinterest. I didn't realize how stinking easy it was to make. I used a styrafoam bowl as my guide.

I sewed the ends so that it would fit right over the bowl. Then I pinned the lace to the bowl.


Then slather modge podge over the lace. I then take out the pins and put it in the microwave for 1 minute. 

Peel the lace of the bowl and slather the modge podge on the inside.Turn the bowl over and place the lace inside. Microwave for 1 minute.

 
It will still be sticky and maluable when done so take out right away and flip the bowl over again and help it keep it's shape for about 30 secs. Then your done! I sprayed mine with spray glitter, but I have also seen them spray painted too.


Yes, this is my baby belly with the crown on it!

Tuesday, October 30, 2012

R-I-E-L


So I was planning on collecting the rest of the letters to my baby girls name over a few months, but I was in Hobby Lobby (dangerouse) one day and couldn't help myself. I bought the last four letters of her name, and some scrapbook paper to match for under ten dollars. I have a horseshoe, but havn't colored it yet, so when that is done I will post all the letters together:) I origonally chose the colors pink, teal, and green for her nursery, but the fabric I wanted was out of date, so I changed the direction. I like the color combo still, but will have to wait and see if it will fit in the new theme. I might have to change the "I" and the "L" letters.


Saturday, October 27, 2012

Baby sack from an old t-shirt

 I saw this on pinterest and had an old shirt that I knew I wanted to do it with. It was a Tinkerbell shirt that was a little small for me. What I did first was lay the shirt down and take an already made sleep sack and lay it on top.

I cut up the sides, leaving a seam allowance, up to the arm pit. I wanted to do a raglan sleeve and not a set in, so I cut up to the neck diagonally. Then I folded it over in half and trace-cut the same as the other side.


I used another t-shirt for the sleeves, so lay the made sleeves on top and trace-cut around leaving seam allowances. I lined it up to the Tinkerbell shirt to get the diagonal cut right.  


Make sure you cut the point off so it doesn't stick out. It needs a neck.

I wanted the fold over sleeves, so at first I cut a peice of fabric the whole width of the wrist, but that didn't work. Make sure you only sew this little pocked on half of the sleeve, not all the way around.

Sew the sleeves to the front and back on both sides.

This is what it looks like after the sleeves are attatched at the armpit. Then you need to sew up the sides of the sack and continue down the sleeve.

I added ruffles on the wrists and then used the exsisting hem to threaad elastic through. I just tightened it the same as the already finished sack. Cute right? I think I will make a hat to match!


Friday, October 26, 2012

Belly bump

 I wanted to take some photos of my belly before the baby comes since this will be my last time to be pregnant. I love the intimate photos that are taken in the persons bedroom and not necessarily focusing on the face. I love silhouette pictures. Here is my go at artistic belly shots.

#1
 
#2

#3

#4

#5

#6

#7

#8

#9

Thursday, October 25, 2012

Halloween banner

 I wanted something for my door, but not a wreath. I saw an idea on pinterest and made it my own. I started with a peice of burlap cut into a rectangle.

Then I sewed around the edge so that it won't unravel, but frey.

I added a ruffle out of a black and white knit.

I like three's

Then I cut out the word "BOO" on my cricut in vinyl.

Place on the burlap and use as a stencil. You can use fabric parkers or parmenant marker.


Then I threaded a wood skewer through the top and used hot glue to secute the ends.

I added a tulle rosette.

Then a ribbon bow with a sequin.

Then I used twine to tie to the skewer to hang it with.

Super cute right? I had to tape it to the door so it wouldn't blow and twist in the wind.

Tuesday, October 23, 2012

Framed photo board

My dear Auntie Racheel has one of these in her home and ever since I saw it I knew I wanted to make one. I found this frame at a thrift store last year before the boys birthday party and I used it for a photo booth. I wanted to use it for more and I knew I had to make this phot board. So it has taken me this long to borrow a saw to cut the plywood to fit in the frame.
 
So first step is to measure the inside of the frame and cut the plywood. Then measure where you want your holes and drill through the marks. Make sure that they are lined up or your ribbons will be crooked.


Then you cover your board with batting.

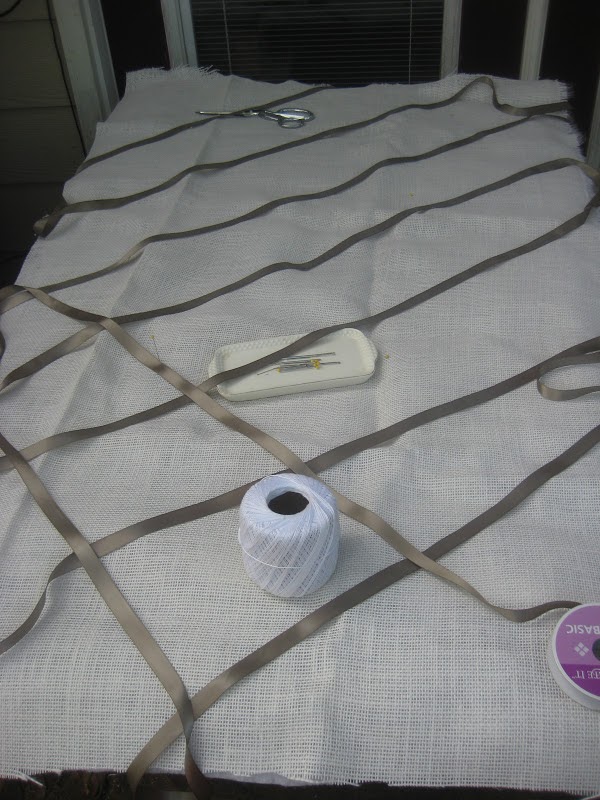
Then cover it with your fabirc of choice. I wanted burlap in a cream color.

Fold the burlap under and staple. It has to be close because you don't want any sagging.
 
Lay out your ribbon and cut it to fit. This step takes the longest time and is very stressfull because the holes have to line up.


Sew your buttons on using a technique with thick thread and an extra button on the back. The back button needs to be bigger than the hole.

So it should be threaded between the two buttons and knot the heck out of it!

This is what it looks like finished after the buttons.

Make sure you sew down or staple the ribbons on the edges. I ran out of staples so I sewed them down.

Place into the frame and screw the plywood to the frame. Make sure the screws are short enough that it doesn't go through the fram, but long enough that it will go into the frame.

Yay! The finished board. I added a metal curly thing on the top (not pictured here).


You can see the metal curly decoration in this one. I screwed it right to the frame.
The boys love it and I because it is such a big frame I had to only put cards on the bottom row and not pictures so they wouldn't get destroyed.